Home › Forums › Restorations › Yankee Restoration
- This topic has 35 replies, 4 voices, and was last updated 2 years, 1 month ago by
 Richard Harrison.
-
AuthorPosts
-
-
December 8, 2019 at 14:32 #13055
 Richard HarrisonParticipant
I am making progress on my Yankee project. I pulled out everything off of the floor…
Inspected, painted, and reinstalled the nose gear torque tube.
I talked about it in another post, if you have a pre-’77 AA-1X (and maybe true with the earlier AA-5’s) I recommend replacing the close tolerance bolts on the torque tube. The pre ’77 called for an AN176-6A. This does not give the correct grip length. My old bolts showed excessive wear on the top of the threads. I had one of these bolts break on my ’76 AA-1B. I changed these to AN176-10A as called out in the AA-1C parts manual. These give the correct grip length.
Dissembled and replaced o-rings on master cylinders (replaced one due to a bent shaft). Reinstalled with new hoses from Fletchair.
Rudder peddles and bars removed, inspected and ready to reinstall later today.
A few weeks ago I picked up the 0320-E2G from Lycon. With the HC STC, this should make this 50 year old Yankee jump.Attachments:
You must be logged in to view attached files. -
December 26, 2020 at 20:41 #15022Richard HarrisonParticipant
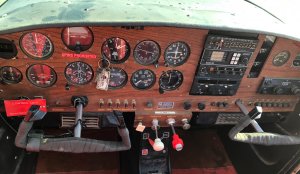
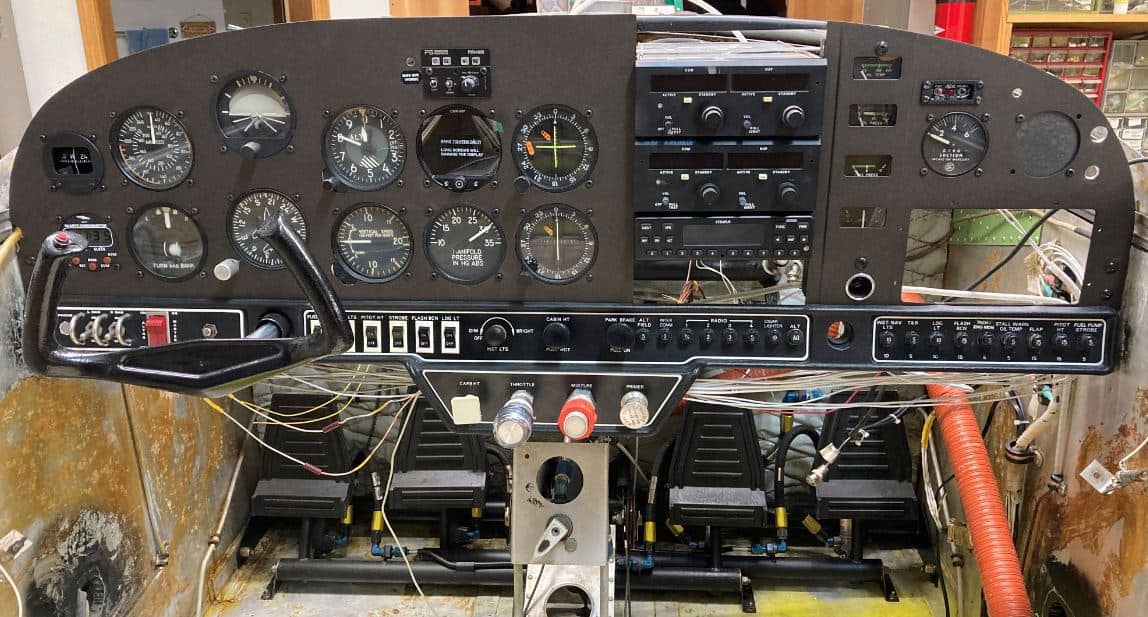
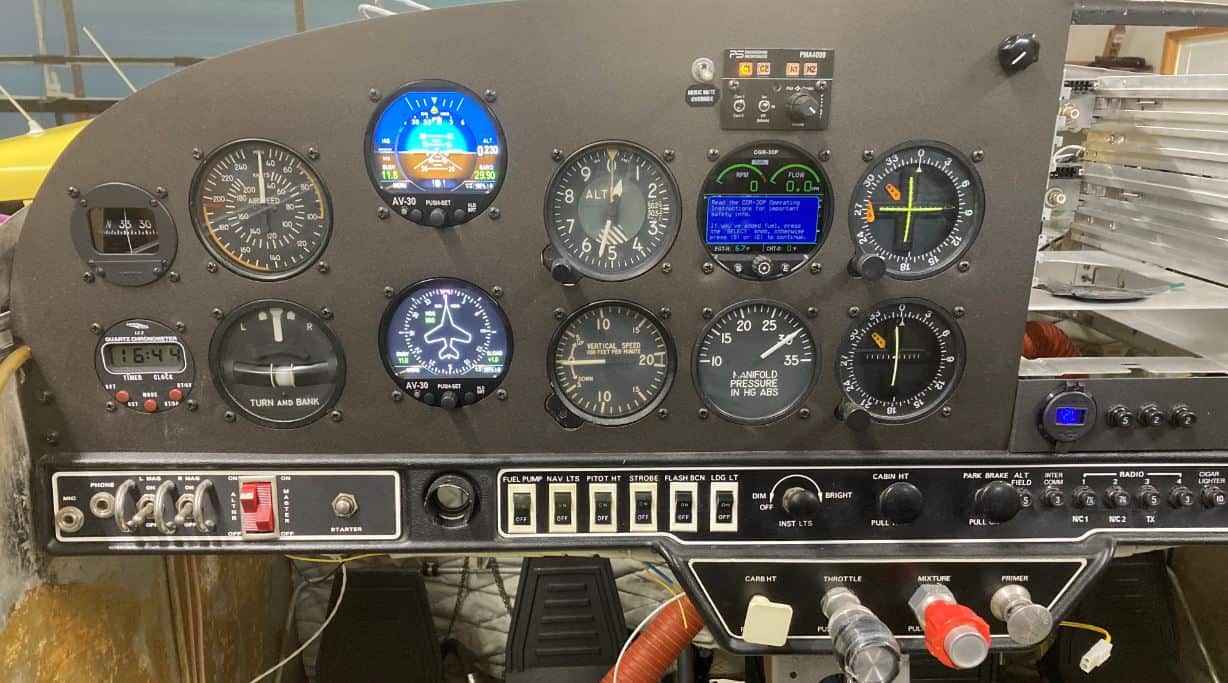
I have not been moving along as fast as I would have liked, but here is the panel as of today. I had sent Narco transponder and the Mark 12D that came with the plane off to the radio shop. $400 later the Mark 12D was fixed, but they said I would likely have the same cost in fixing the transponder. Rather then put any money into it and purchasing a Tailbeacon for $2K, I purchased a Stratus ESG transponder with the companion Stratus 3i for $3200 that gives me ADS-B In and Out. I have the same setup in my C-182 and like it.
I also picked up a second Mark 12D with Glideslope for $500 and since the plane already had an audio panel I added it. I sent it and the Mk-12D out of my AA-1B into the shop and had them checked and aligned. The one out of my -1B I purchased in 1987 used. It has only been in the shop twice since, both times for display replacements. It has been a great radio. I have a new display on the shelf I bought after Narco went out of business. Now I should be set, but all 3 MK-12Ds have strong displays. I wish I could say the same for the King KX-155 in my 182. Try finding a working display for it! A working used display will run you $500+ with no guarantee. I payed a little over $200 for a brand new Narco display.
I got the trays installed today. The avionics wiring harness is completed and laying on the bench. I will start installing the harness next week.
I am seriously considering pulling the vacuum gyros out and installing the uAvionics AV-30C. I have to buy a vacuum pump anyway and these gyros have not been run in probably 5+ years and I am guessing they will need O/H. I know that would only run me probably $1200 or so to do that, but the advantages of the AV-30 is a lot more capability, and probably about 14 pounds of weight saving. I am going to wait a bit and see if they go on sale for SNF or OSH.
I am planning on adding a plate under the Transponder to have room for more circuit breakers. I will need two more for the AV-30’s and have room for the future. I will run the wires for them so to be ready to install them when I purchase them.Attachments:
You must be logged in to view attached files. -
December 26, 2020 at 21:26 #15026
 Roscoe RoschéKeymaster
Nancy is right, you have been busy on the Yankee
-
January 5, 2021 at 08:09 #15071
 John C FordParticipant
I love the toggle switch guards on the left side next to the master (part numbers, please).
Richard and or Roscoe, I want to make a panel overlay in gray for my AA1-A. Does anyone know where the blueprints can be fount for the instrument panel itself? The reason I ask is I want to scribe the panel overlay in my AutoCAD and sent it out to be cut.
Richard, the black material you have looks nice. Did you have the information to locate all the holes, or did you scribe it in out of raw material. Any help would be greatly appreciated.Thank you.
~J~
-
January 5, 2021 at 10:30 #15074Roscoe RoschéKeymaster
PDM-012 – Bare Polished Aluminum Switch Guards
-
January 5, 2021 at 13:08 #15077Richard HarrisonParticipant
See Roscoe’s video on this here…
I used the Stainless Steel switch guards as they have a slightly longer stud, which was needed to get through the thicker panel. Mark Mathews helped produce the drawing that was then sent in to get the new overlay panel made. -
January 5, 2021 at 14:07 #15083John C FordParticipant
Very cool, thank you. Are these still available (placards)? Also, my panel needs to be redone. The panel has been converted to toggle switches for all the electrics such as: Fuel pump, landing light, NAV, strobe, etc. I would like to do the same in this area complete with switch guards. As you can see, I have my work cut out for me.
Back to my original question, does anyone know where we can source the original manufacturing prints to cut new panel material?
Attachments:
You must be logged in to view attached files. -
January 5, 2021 at 15:20 #15088Richard HarrisonParticipant
Wow, that looks like plywood used for the panel overlay! That must be heavy (also add the Apollo 618 and King KR85 boat anchors). I see a weight reduction program here.
For the upper panel I purchased the aluminum overlays from Gary Vogt (www.aucountry.com) and had them powder coated.
For the lower panel (switch & fuse panel), Fletchair use to have new blank plastic overlays (5102315-503). If they still do, you can start with that. The Yankee and AA-1A panels are different then the later Grumman fleet as they have one less switch position, and less space for breakers and fuse holders. The metal instrument panel is cut differently then the later ones. The metal switch and fuse placards that go over the plastic sold by Fletchair will not work. The one for the engine controls would work (5803001-40). The best option for the switch placards might be to go the route that we did for the mag switch placard (unless good used ones can be found).
I got the attached files Mark Matthews for the toggle mag switch mod. The .fpd file was sent to Front Panel Express (frontpanelexpress.com) to get made. If you can work with their design software you can design the other two lower panels. These are engraved aluminum and look nice. I think you can get them in multiple colors.
Roscoe might be able to help you out with some of these parts, and he might have good serviceable placards from an AA-1 or AA-1A.
Once you get all the parts, then the fun begins! All the controls that pass through the panel need to come out of the plane. All the fuse holders need to be pulled (good time to change them to Klixon CBs). All the instruments need to be unscrewed from the panel and let hang. On the AA-1A, you need to pull the plastic cabin vent airboxs off the bottom of the panels so you have access (very carefully, they are siliconed to the side of the airplane).
Have fun!
Note – I can only attach 3 files at a time, there are a total of 5 files from Mark. I will follow up with the other two.Attachments:
You must be logged in to view attached files. -
January 5, 2021 at 15:29 #15091Richard HarrisonParticipant
Follow up – The forum SW will not allow the upload of the .fpd file. I will to send that to you directly.
Attached are the last two files from Mark.Attachments:
You must be logged in to view attached files. -
January 5, 2021 at 15:48 #15096John C FordParticipant
Richard, you are a great help. I can’t wait to share my progress with the group.
Thank you, so much!
~J~
-
March 20, 2021 at 17:03 #15496Richard HarrisonParticipant
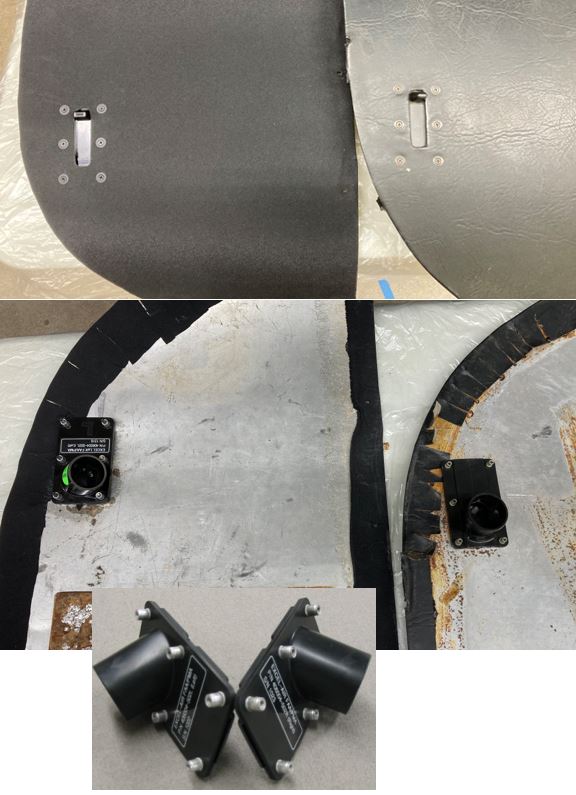
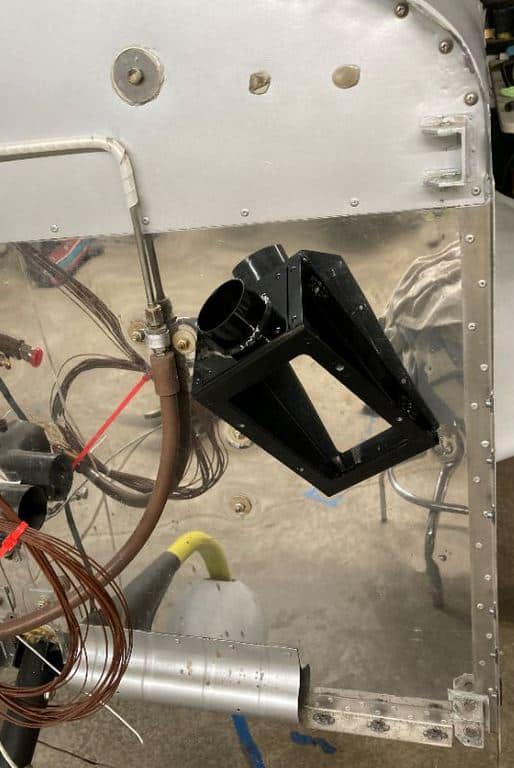
I redid the instrument panel top deck with new fabric and had purchased a new defrost vent from John Sjaardema (Excel-Air Services) and found out something. John’s latest style of vents he makes one for the left hand and a different one for the right hand side (for the AA-5 and the rare AA-1 that had the optional right side). The difference is they are designed to have the air inlet port sweep back toward the firewall, and when you lift the cover up from the hose is in a good position to remove or install. The issue is I found is on the AA-1, the panel is cut such that the one John makes for the left side can only be installed backwards. I verified this is the same on my Yankee project as well as on my ’76 AA-1B. This positions the inlet vent so that it sweeps forward, and it is difficult to get the hose on and off in that position. I talked to John and he is sending me one that he makes for the right side. I think that will fit correctly on the AA-1.
In the attached picture the cover on the left side is from my Yankee project with John’s newest vent installed, the one on the right is from my -1B with John’s old style vent. I inserted a picture of John’s new vents from his website. As stated above, the inlet port should sweep forward (toward the firewall) not back. This should make easy access for getting a nut driver on the clamp.
So if you order one for you AA-1, have him ship you one designated for the Right side. AA-1’s don’t know their right from left side….Attachments:
You must be logged in to view attached files. -
March 23, 2021 at 13:17 #15504John C FordParticipant
What material did you use to cover the deck in both cases. I like the gray on the left.
-
March 23, 2021 at 16:24 #15506Richard HarrisonParticipant
It is a light weight black rayon/wool fabric I picked out as dull as I could find. The panel on the right from my AA-1B I cover with naugahyde some 25+ years ago. Problem is it is too shiny for night flying as it reflects light up into the windshield. It also has since been stripped and recovered.
I was looking for a light weight weaved fabric as adding texture also reduces light reflection but did not find anything I liked. -
October 4, 2021 at 21:01 #16320Richard HarrisonParticipant
I had not been doing any work on the Yankee for over 8 months as we were traveling then I had Annuals and work to do on my other two planes, house projects, etc.
A couple of weeks ago I moved my Cessna to another hangar and this will give me the room to pull the Yankee out of the corner and give the room needed to hang the engine and mount the wings and tailfeathers.
So I have been getting back into it, after trying to remember where I had left off. This morning FedEx brought Christmas early, in the form of a pair of uAvionics AV-30’s. Early this year I had decided to go with them and had pulled out the vacuum system and ran all the wiring to support them.
I put them in today. There Alive!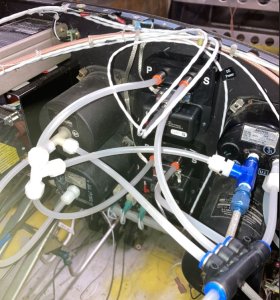

Attachments:
You must be logged in to view attached files. -
October 24, 2021 at 20:21 #16387Richard HarrisonParticipant
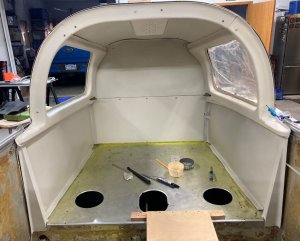
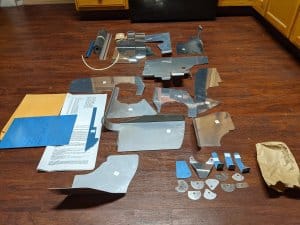
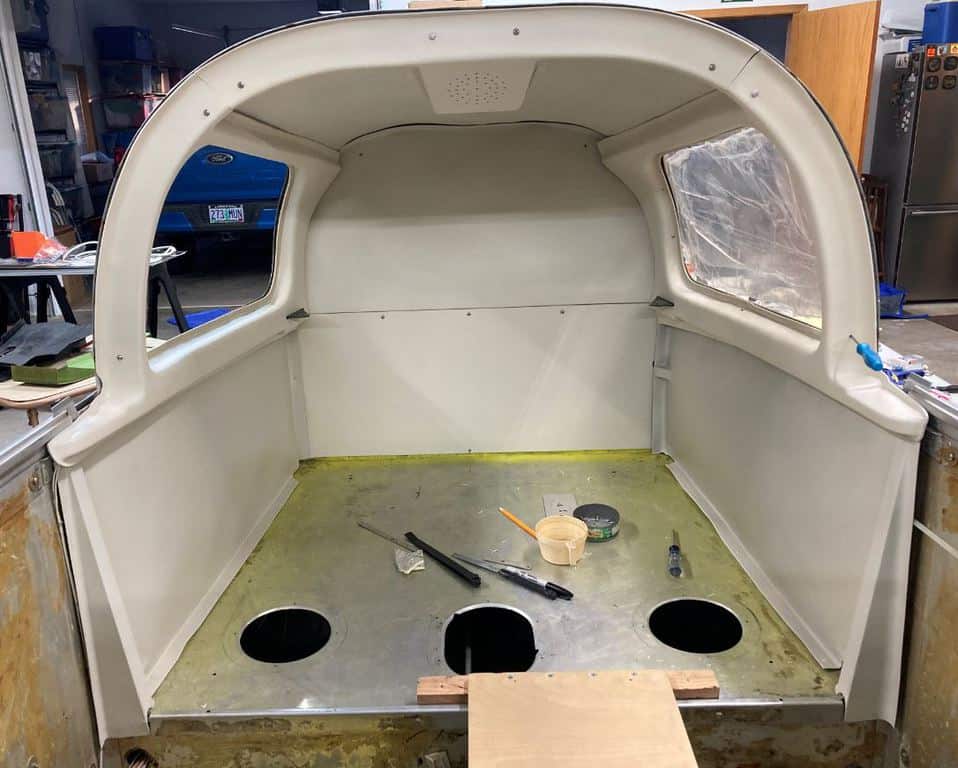
I have been working on the interior plastic, much of it is now unobtainable.
Plane plastics use to make the side window trim the speaker housing, battery box and the center console for the 2 place, not sure they still do. So for the most part you are on your own to try to save the old crumbing plastic, or fabricate a replacement. I have been doing patching on several pieces like the baggage area side panels, site gage side panels, and the rest.When I picked up the Yankee, the lower back baggage wall was pretty well busted up. I did not worry about that piece, as that is one that is easy to make. It is a flat piece of plastic with no molding needed. I had made one for my AA-1B over 10 years ago out of a sheet of ABS plastic. You could also make this piece out of a aluminum.
I ordered a 2′ X 4′ sheet of .06″ thick ABS through my local Home Depot Aircraft department. It cost $16.45 with free shipping to the store for pick-up. I picked it up yesterday and pulled the lower back wall out of my AA-1B to use for a pattern. I am cutting it out now. It only is available from them in black, so it will be painted. It is textured on one side that somewhat matches the texture on the old plastic.
While doing that I started looking at the upper rear baggage wall and started to think, you know I think I could make that by making a mold to form the ABS with a heat gun to form the rap across the top and the detent on the bottom. Unfortunately the one sheet of ABS I got is not big enough to make both parts. I am thinking of buying more and see if I can make a former to make the bends at the top and bottom. It would be a challenge.
I wish I could do the baggage wall sides also, but they have lots of formed curves in them and would require more work and effort then I can do.
If I am successful in making the upper piece and the mold works, I am sure I could make a few more. I am not going to spend a lot of time on it, as the upper piece I have is not that bad and I could use it.Attachments:
You must be logged in to view attached files. -
October 24, 2021 at 22:20 #16389Richard HarrisonParticipant
Fitted. Now match drill the mounting holes and paint.
Attachments:
You must be logged in to view attached files. -
October 24, 2021 at 22:35 #16391Richard HarrisonParticipant
Also today I did the firmware update on the uAvonics AV-30Cs. The big thing with this update is suppose to be improvement in the Directional Gyro performance.
I first tried the update yesterday, but using the procedure listed in the Service Bulletin I could not get my computer to connect to the AV-30. Today I stumbled on a different path and was able to upgrade them. I sent a report to uAvionics of what I ran into and what I did to complete the upgrade. I am not sure if I am a one-off, or the procedure in the SB was documented wrong.
A possible sign of good news is after the upgrade I set both units to a heading, and after 15 minutes one had drifted 1°, the other was dead on. This is a huge improvement over the old software, but must be noted this is sitting in the hangar.
If this does fix the DG drift issue and if they can get more features added (through the FAA), I think the AV-30 will be a winner in the market.Attachments:
You must be logged in to view attached files. -
November 3, 2021 at 23:16 #16433John C FordParticipant
All the progress looks great. Did you use similar ABS material for your panel overlay? The uAvionics gear looks great. I was just shopping for ABS sheets just earlier this week. Thank you for the ideas. I am sure you heard that Grumman Parts is offering some of the plastics we need. They have prices on only one item though.
https://grumman-parts.com/product-category/aa1-series-plastic-interior-parts-exterior-fairings/
-
November 4, 2021 at 12:56 #16434Richard HarrisonParticipant
The overlay is from Gary Vogt and is aluminum. I had it powder coated.
Great to see they are moving ahead with making those parts. This is the first time I have seen the upper rear baggage wall, and the lower baggage wall sides produced since the factory shut down.
Note the Baggage Wall Sides need the Endcap (left and right). Those were molded as one piece at the factory, as well as the bow cover and speaker grill.
I just spent the last couple of days refurbishing those parts and painting them with SIM paint. I plan to trial fit them today.-
This reply was modified 2 years, 6 months ago by Richard Harrison.
Attachments:
You must be logged in to view attached files. -
This reply was modified 2 years, 6 months ago by
-
November 4, 2021 at 17:47 #16437John C FordParticipant
I was thinking the end caps from Grumman Parts need to be glued together.. Same with the speaker cover. I did notice that. 100 is a little high for just the bow portion.
Gary’s page is awesome! I need one of those overlays. I would like the alternate parking break as well.
-
November 4, 2021 at 18:50 #16438Richard HarrisonParticipant
If they are making these pieces, it might be a better option then trying to fabricate new ones yourself. I have seen some poor looking interiors where the remnants of the old plastic was covered with fabric other materials that added weight.
As I mentioned I was thinking I might try to make the upper back wall, but even that effort would take a fair amount of time to construct the molds to form the plastic on. Now that I know someone else is doing it, I would not bother trying to duplicate it.
I was able to repair the original one, it did not come out too bad.
This is a good overview of how to repair plastic.
This has for me produced the best results. You don’t need to buy their repair kit, but you would need to have an old plastic part that can be sacrificed to be cut up in little tiny pieces and left soaking in MEK overnight. My wife being a diabetic has some small syringes without needles that worked out perfect to use as an applicator.
In past years through recommendations over the GG and other places I tried repairs using screen door material and various epoxies and also fiberglass. These never worked out well long term. -
November 4, 2021 at 20:50 #16439Richard HarrisonParticipant
First fitting of the baggage wall pieces. I need to lower the static line at the back baggage wall about 1/2″ to match with channel in the plastic.
Then on to the window frame parts and the speaker grill. I got a new speaker in from Skygeek today. Spruce no longer carries the 4″ round speaker.-
This reply was modified 2 years, 6 months ago by Richard Harrison.
-
This reply was modified 2 years, 6 months ago by Richard Harrison.
Attachments:
You must be logged in to view attached files. -
This reply was modified 2 years, 6 months ago by
-
November 8, 2021 at 13:59 #16475John C FordParticipant
Looks good.
-
November 15, 2021 at 19:13 #16496Richard HarrisonParticipant
First trial fit of all the baggage area plastic and headliner. More work to do and need more SIM paint to get everything to match.
Attachments:
You must be logged in to view attached files. -
November 25, 2021 at 19:18 #16541Richard HarrisonParticipant
Trying to get a little done each day. Got the baggage area all fitted, screw holes located and repainted so everything now matches.

I also started working on the oil cooler mount. I got a firewall mount from Ken Blackman’s inventory and just alodined, primed and painted it.
One thing I discovered is the mount I have is for a 6 or 7 vane oil cooler, the one I got with the project is a 5 vane. I am going to go ahead and get a 7 vane, which is the same one I have on my AA-1B.
If anyone could use a 5 vane cooler that was O/Hed by Pacific Oil Cooler for Lycon, contact me.-
This reply was modified 2 years, 5 months ago by Richard Harrison. Reason: Posted wrong picture
-
This reply was modified 2 years, 5 months ago by
 Roscoe Rosché.
Attachments:
You must be logged in to view attached files. -
This reply was modified 2 years, 5 months ago by
-
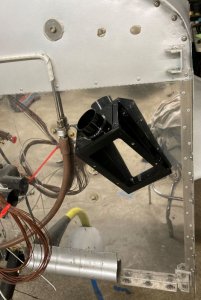
December 6, 2021 at 21:07 #16605Richard HarrisonParticipant
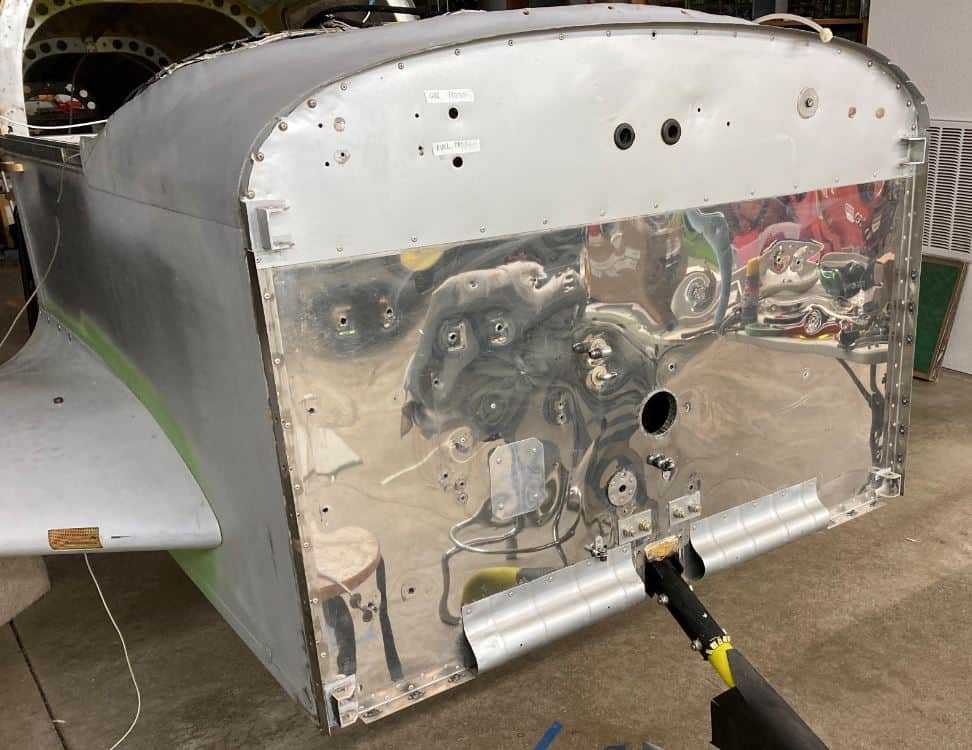
OK, as I started working on the firewall in preparation of hanging the engine, one thing I noticed is the firewall blanket was in worse shape than I thought.
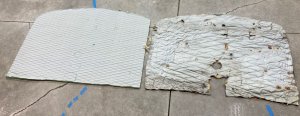
I decided to replace it, this is a bit of a setback, everything had to be disconnected and removed that passed through the firewall or had bolts that did and through the blanket. I wish I had done this when I had the panel, nose gear torque tube and rudder bars out. New blanket is cut out and I will start putting it in tomorrow.
Attachments:
You must be logged in to view attached files. -
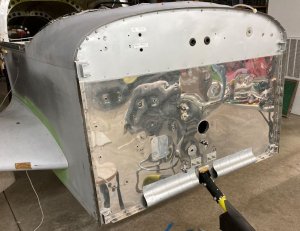
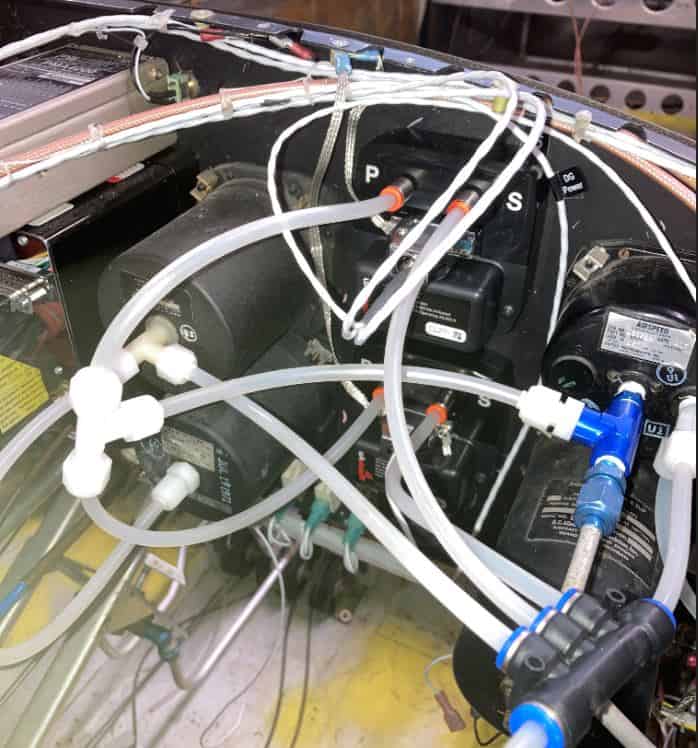
December 16, 2021 at 17:24 #16646Richard HarrisonParticipant
Almost back to where I was when I decided to replace the firewall blanket. New blanket is installed, most stuff that touches the firewall have been reinstalled.
I left the battery tray off as I am hopefully going to install it in the back, if I can get ahold of Maynard Crosby so I can use his STC (no luck with that yet).
Next I need to put new firewall sealant around the cabin heat box and a few other spots. I purchased the Flamemaster CS-1900 to do this. I understand this cartridge is designed for a special applicator, but I will do the best I can with what I have.
Attachments:
You must be logged in to view attached files. -
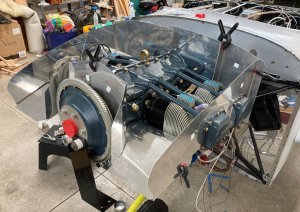
December 30, 2021 at 19:18 #16695Richard HarrisonParticipant
The engine is finely off the floor. Casper Labs 90° oil filter adapter and Surefly installed on the left side.
Attachments:
You must be logged in to view attached files. -
January 3, 2022 at 21:00 #16707Richard HarrisonParticipant
Does anyone know which gasket to use between the airbox and the carb? The parts book of coarse calls out a Grumman # (503006-14) that does not come up at all on Google. I would think any aircraft with the MA-4spa carb would use the same gasket to the airbox? It looks to be a bit bigger then the carb to engine gasket, with about 2 1/2″ spacing on the bolts.
Checked the Fletchair catalog and it only shows the gasket from carb to engine.
If anyone has a clue what to get, let me know.
-
January 19, 2022 at 17:58 #16756Richard HarrisonParticipant
Can we get Gardner out of retirement please???
A year ago I purchased a throttle support bracket from Fletchair. Their ebay add said part number 501112-502 is for the AA-1 series. I went to put it on my Yankee today and had a problem. The cable takes a big jog to the right and does not come close to running in a straight line from the firewall to the throttle arm (see pictures). Checking my AA-1B, it runs straight. Looking at the bracket, the plate that bolts to the bottom of the carburetor is 1/2 to 3/4″ narrower then the bracket I bought.
A check of the parts catalogs show that all the AA-1 series had part number 501112-501. -502 shows up in the AA-5 parts catalog for AA-5 SN 0001 to 0640, after which they went to the -503.As far as my search for the gasket for the carb heat box to carburetor I ordered a TCM Air Intake Gasket #649974 from Spruce, it is a perfect fit.
Attachments:
You must be logged in to view attached files.-
January 19, 2022 at 22:18 #16760Roscoe RoschéKeymaster
Send me a picture, I have the entire panel out of the Yankee, complete.
FYI
-
-
January 19, 2022 at 20:03 #16759Richard HarrisonParticipant
Update, I sent an email to David about the bracket. He located a -501 bracket and will be shipping it to me tomorrow.
Also, the Vans RV baffle kit from Roscoe should arrive tomorrow. More fun. This will go with the Vans wheel pants I bought from Fletchair. -
January 20, 2022 at 21:04 #16765Richard HarrisonParticipant
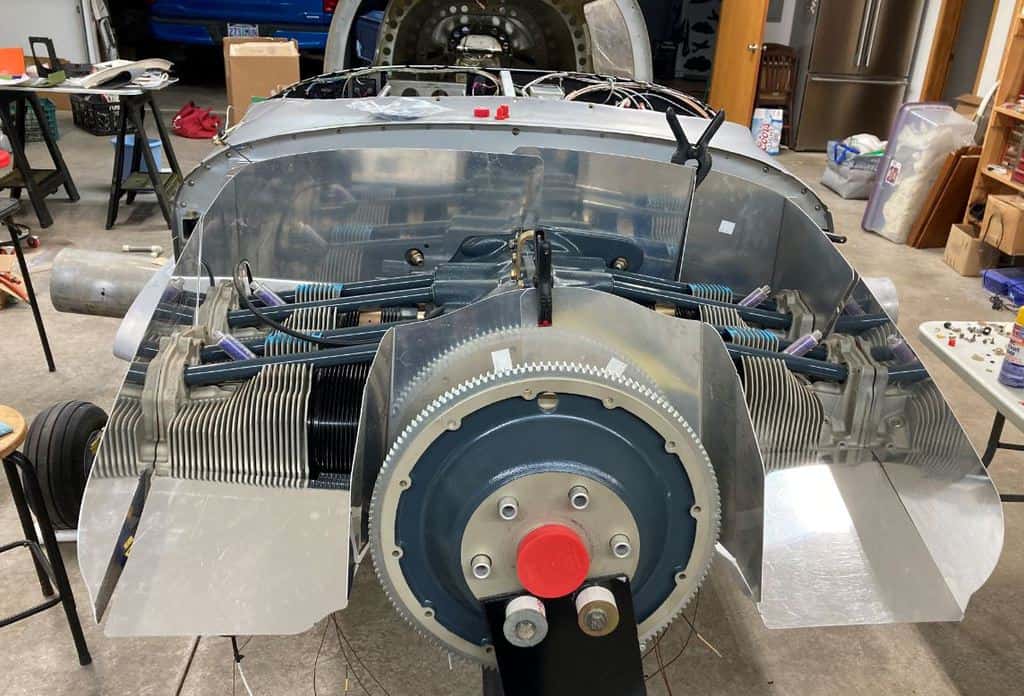
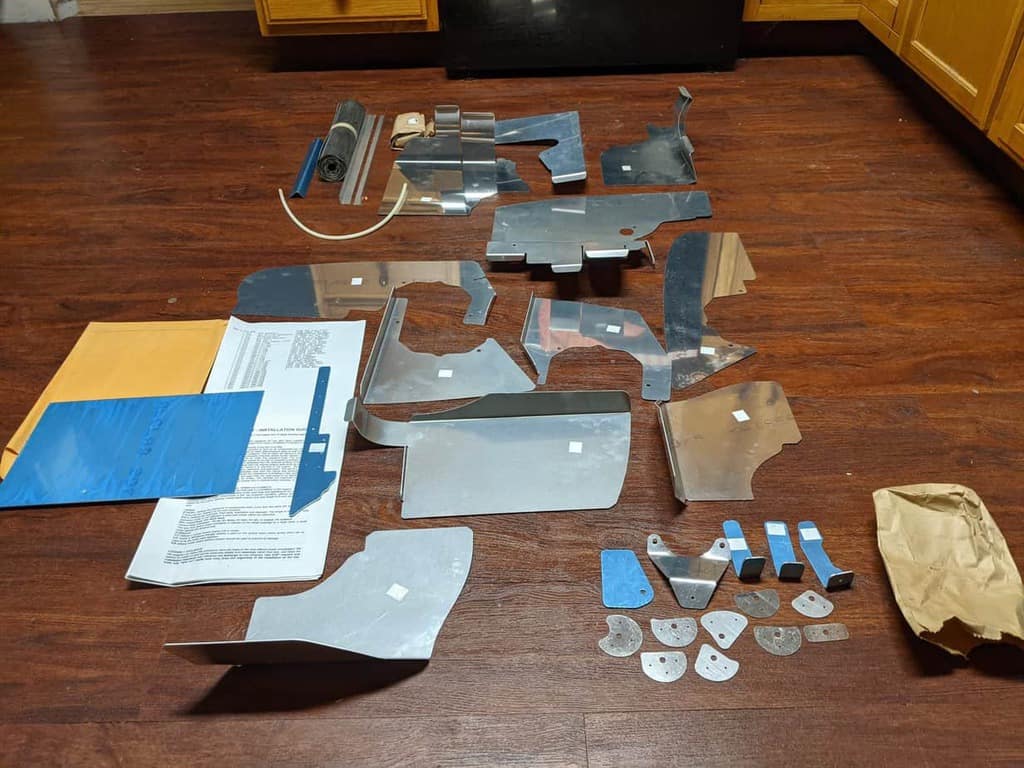
I received the Vans RV baffle kit today, attached are pictures of the major parts sitting on the engine. These were made for the RV cowling, and will require some work to fit up to the Grumman cowl.
Notice the pieces to enclose the area behind the flywheel to prevent air from escaping there (a big airloss on the AA-1 baffles).
Cliff Hanson gave me a bunch of pictures of how he used this same RV baffle kit on the AA-1C that he just sold and some of the other cooling tweaks he made. He is convinced I will be fine, and could use the stock AA-1 nose bowl with the round inlets with no cooling issues. I have an AA-1C (or ’76 AA-1B) nose bowl with the larger square inlets I intend to use, but I also have an earlier AA-1 nose bowl that another airpark neighbor sold me. I plan on flying with the square inlets at first, then if Cliff is correct I can swap it out with the round inlet nose bowl.

Here are the parts I sent to Rich:
Attachments:
You must be logged in to view attached files. -
February 19, 2022 at 21:32 #16823Richard HarrisonParticipant
Got the baffles trimmed on the side and the back. Next I need to fit the nose bowl to the cowl to do the front.
I have two nose bowls, one off of another early AA-1 or AA-1A that a neighbor gave me, and one from a ’77 AA-1C that I had intended to use. Turns out that the early production AA-1’s look to have been match drilled on the assembly line floor. Neither nose bowl holes will match up to the my AA-1 lower cowling. The AA-1C nose bowl I have is kinda close on the left side, but off on the right. The other early bowl is off all over the place.
The AA-1C bowl fits my ’76 AA-1B perfectly, which tells me Grumman fixed this production issue later on.
When I picked up the project from Roscoe and I had decided I was going to put a 0-320 in the Yankee, the square inlet AA-1C nose bowl might be needed for cooling. Since there was an AA-1C nose bowl available from Ken’s inventory I took it and I left the original nose bowl at Roscoe’s shop. Now with other improvements I am doing, several experts have told me the original nose bowl with the oval openings should be fine. Working with Matt (Shop Monkey), I think we have found the original nose bowl. But to be sure, I made a template from my lower cowl to match up with the holes of the nose bowl and mailed it to him. If that is the case I will have him ship it to me.Attachments:
You must be logged in to view attached files. -
March 22, 2022 at 22:56 #16867
William Shepard
ParticipantDoes anyone have a close up picture of the canopy bow attaching hardware? I am looking for items #11 and #12. They look to be some little brackets or retainers. Whoever took this thing apart lost them.
Attachments:
You must be logged in to view attached files. -
March 23, 2022 at 12:43 #16869Richard HarrisonParticipant
It is under the plastic on my AA-1B, don’t have a picture of that.
I would need to go through my stuff on the Yankee project, I have not started on the windshield yet.
-
-
AuthorPosts


- You must be logged in to reply to this topic.