Home › Forums › Maintenance of Grummans › Cabin › Loose Seat Bolts
Tagged: AA5, AA5A, AA5B, Cheetah, Loose Brackets, Seat Brackets, Tiger, Traveler
- This topic has 0 replies, 1 voice, and was last updated 9 years ago by
Anonymous.
-
AuthorPosts
-
-
April 20, 2015 at 23:22 #1586
Anonymous
InactiveLoose Seat Bolts
Ever since I have been in the Grumman Fixin’ business we have learned to check the three AN-3 (3/8” head) bolts that hold each of the 4 front seat mount8ing brackets to the center spar in all AA-5 series models. On Tigers, especially, we usually find they need tightening. If this is not done, and they come really loose, the bracket(s) will move around and the seat may not want to latch in the selected position requiring the “butt giggle” maneuver most AA-5 pilots are familiar with. Now and then I encounter something that demands that old slap on the forehead and something like; “Why didn’t I ever see this before now” to spout forth from the mouth of the guy who is supposed to know everything..
A few weeks ago I got a call from a regular customer based at Boeing Field in Seattle. He said he had a stuck seat and lurched backward to free it and it all came loose from the right side. I made a trip to his tiedown to meet with him and see what was the problem, having with me what I thought could possibly fix the situation. He had tried to loosen these three bolts on the left support thinking that was the way to get the seat out so, between him and I, we finally got the seat out and found the right bracket had the lower, forward bolt missing, the next one up sheared off, and the back one (on top of the spar) about to come out. I had checked the Parts Catalog for the correct bolts and had them with me. We fished in the console with a magnet and found the one broken off bolt that had sheared at the end of the shoulder and the front one that had just pulled out of the riv-nut in the spar. The riv-nut flange was cocked and partially broken. What startled me was the length of the bolts were one length too short, per the APC (Approved Parts Catalog) and had only engaged about 2 or 3 threads in the countersunk riv-nuts seated in the spar. They also had a full thickness washer, AN960-10, under the heads. The APC calls for an AN3-6A bolt and these were AN3-5A. It also calls for one MS35333-39 (AN936A-10) “star washer” (a lock washer with the internal gripping teeth) under the bolt head instead of a full thickness AN-960-10 washer. (One confusing thing is, in the number of parts called for, there are 6 bolts and 12 washers for each seat. Looking at the pre-1977 APC, it calls for the same thing but breaks out the extra 6 star washers as having one above the spar and under the bracket, the other under the bolt head. This makes no sense to me.)
A week or so later I was able to get a gap in the rain and return to finish the job. I was armed with a reversing drill, battery angle drill, new riv-nuts and hardware, the tool to pull the riv-nuts, and proper drills to get the brackets installed. The sheared off bolt in the top position backed out with a reverse drill and, when I went to drill out the broken and cocked riv-nut the whole thing just pulled out of the spar. It was never “pulled” properly. When I installed the replacement, my “Threadsetter” tool didn’t seem to collapse the area of the riv-nut above the threads that makes the “bulge” that causes it to stay tight. (These are part number S10-266, from the APC, and I got them out of the corresponding parts bin in our stock room.) The top one had not been damaged after getting the sheared bolt threads out, so I retained it in place. Getting all three new (proper length) bolts in place, with a thin washer and a locking “star” washer under the head, I began torquing them. At first, it felt pretty snug, then it relaxed and I was able to get another full turn or more before it came up to torque. This indicated they were only inserted and not fully “pulled”. This would account for the chronic looseness we have dealt with all these years. My thought was; “Is this going to be the condition in other Tigers?”
Returning to my shop I checked a Cheetah we had just installed a Tiger spar in, which still had the wings off, and looked at the inside end of these riv-nuts. Some looked like they were as we had found with Dave’s airplane but some looked like they were only partially collapsed with an uneven bulge against the spar. I didn’t see any that really looked good. I haven’t tried to “re-pull” any yet but expect to see what was going on with the field maintenance operation. A couple of days later we rolled in the nest Tiger in line for its annual and, sure enough, we found loose bolts. This is the first annual we are doing on this plane so no steps will be skipped. When removed, they were, as I suspected, the AN3-5A bolts with only the thick washers under the heads. I did not change these bolts, rather one of our mechanics did, and he said they torqued normally. I made a re-check and it seemed they had. We installed all of these (both sides of both seats) like I had in Dave’s plane and intend to leave them alone. I think it all makes sense they way we did it.
The wall thickness of the 3 spars used in our aircraft are quite different. The Tiger spar is, by the drawings, to be a minimum wall thickness of .281” but they usually measure around .300”. The one used in the Traveler and Cheetah is called out to be min. of .248” but will measure .264” in actuality. Then there is the one from all 2 place models which is quite a bit thinner. (That installation does not use the same brackets and calls out for bolt I never heard of so, since it’s not got a problem I’ll not go there. What is interesting is the two thickness of spars is to have the same countersunk riv-nut and the same bolt and washer combination (except for the early models having a star washer listed UNDER the bracket and above it. Again, this makes no sense whatsoever.
To bring this to a conclusion, share this article with your mechanic before your next inspection. If that is you, then do it whenever you want. If you have experienced any of the symptoms I have mentioned it may be wise not to wait for your annual but get at it ASAP to prevent having a problem. One tip is to remove the triangular pads bolted to each of the 4 support brackets. This allows much easier access to the subject bolts and it only requires pulling two little bolts and nuts each support. (Just be sure to reinstall them on the proper sides of the brackets.)
Ken Blackman,
Air Mods N.W.photo captions:
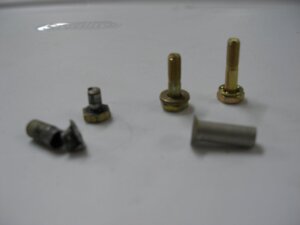
This is one of the broken bolts and the broken riv-nut as removed from the spar. Also a new short bolt and washer as installed beside the proper AN6-6A with the single STAR washer. Also shown is a new S10-266 riv-nut.
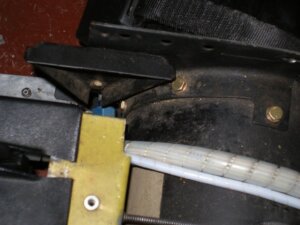
Inboard, right hand, seat support installed with new bolts.
-
-
AuthorPosts


- You must be logged in to reply to this topic.