Home › Forums › Restorations › AA-1B 1487R Restoration
- This topic has 46 replies, 7 voices, and was last updated 2 years ago by
William Shepard.
-
AuthorPosts
-
-
February 16, 2021 at 12:10 #15338
William Shepard
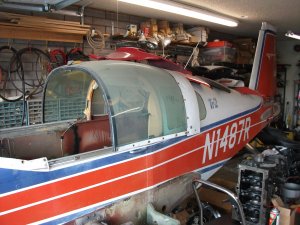
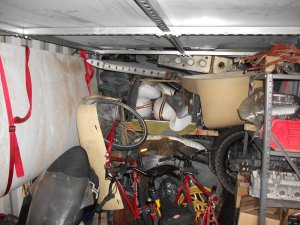
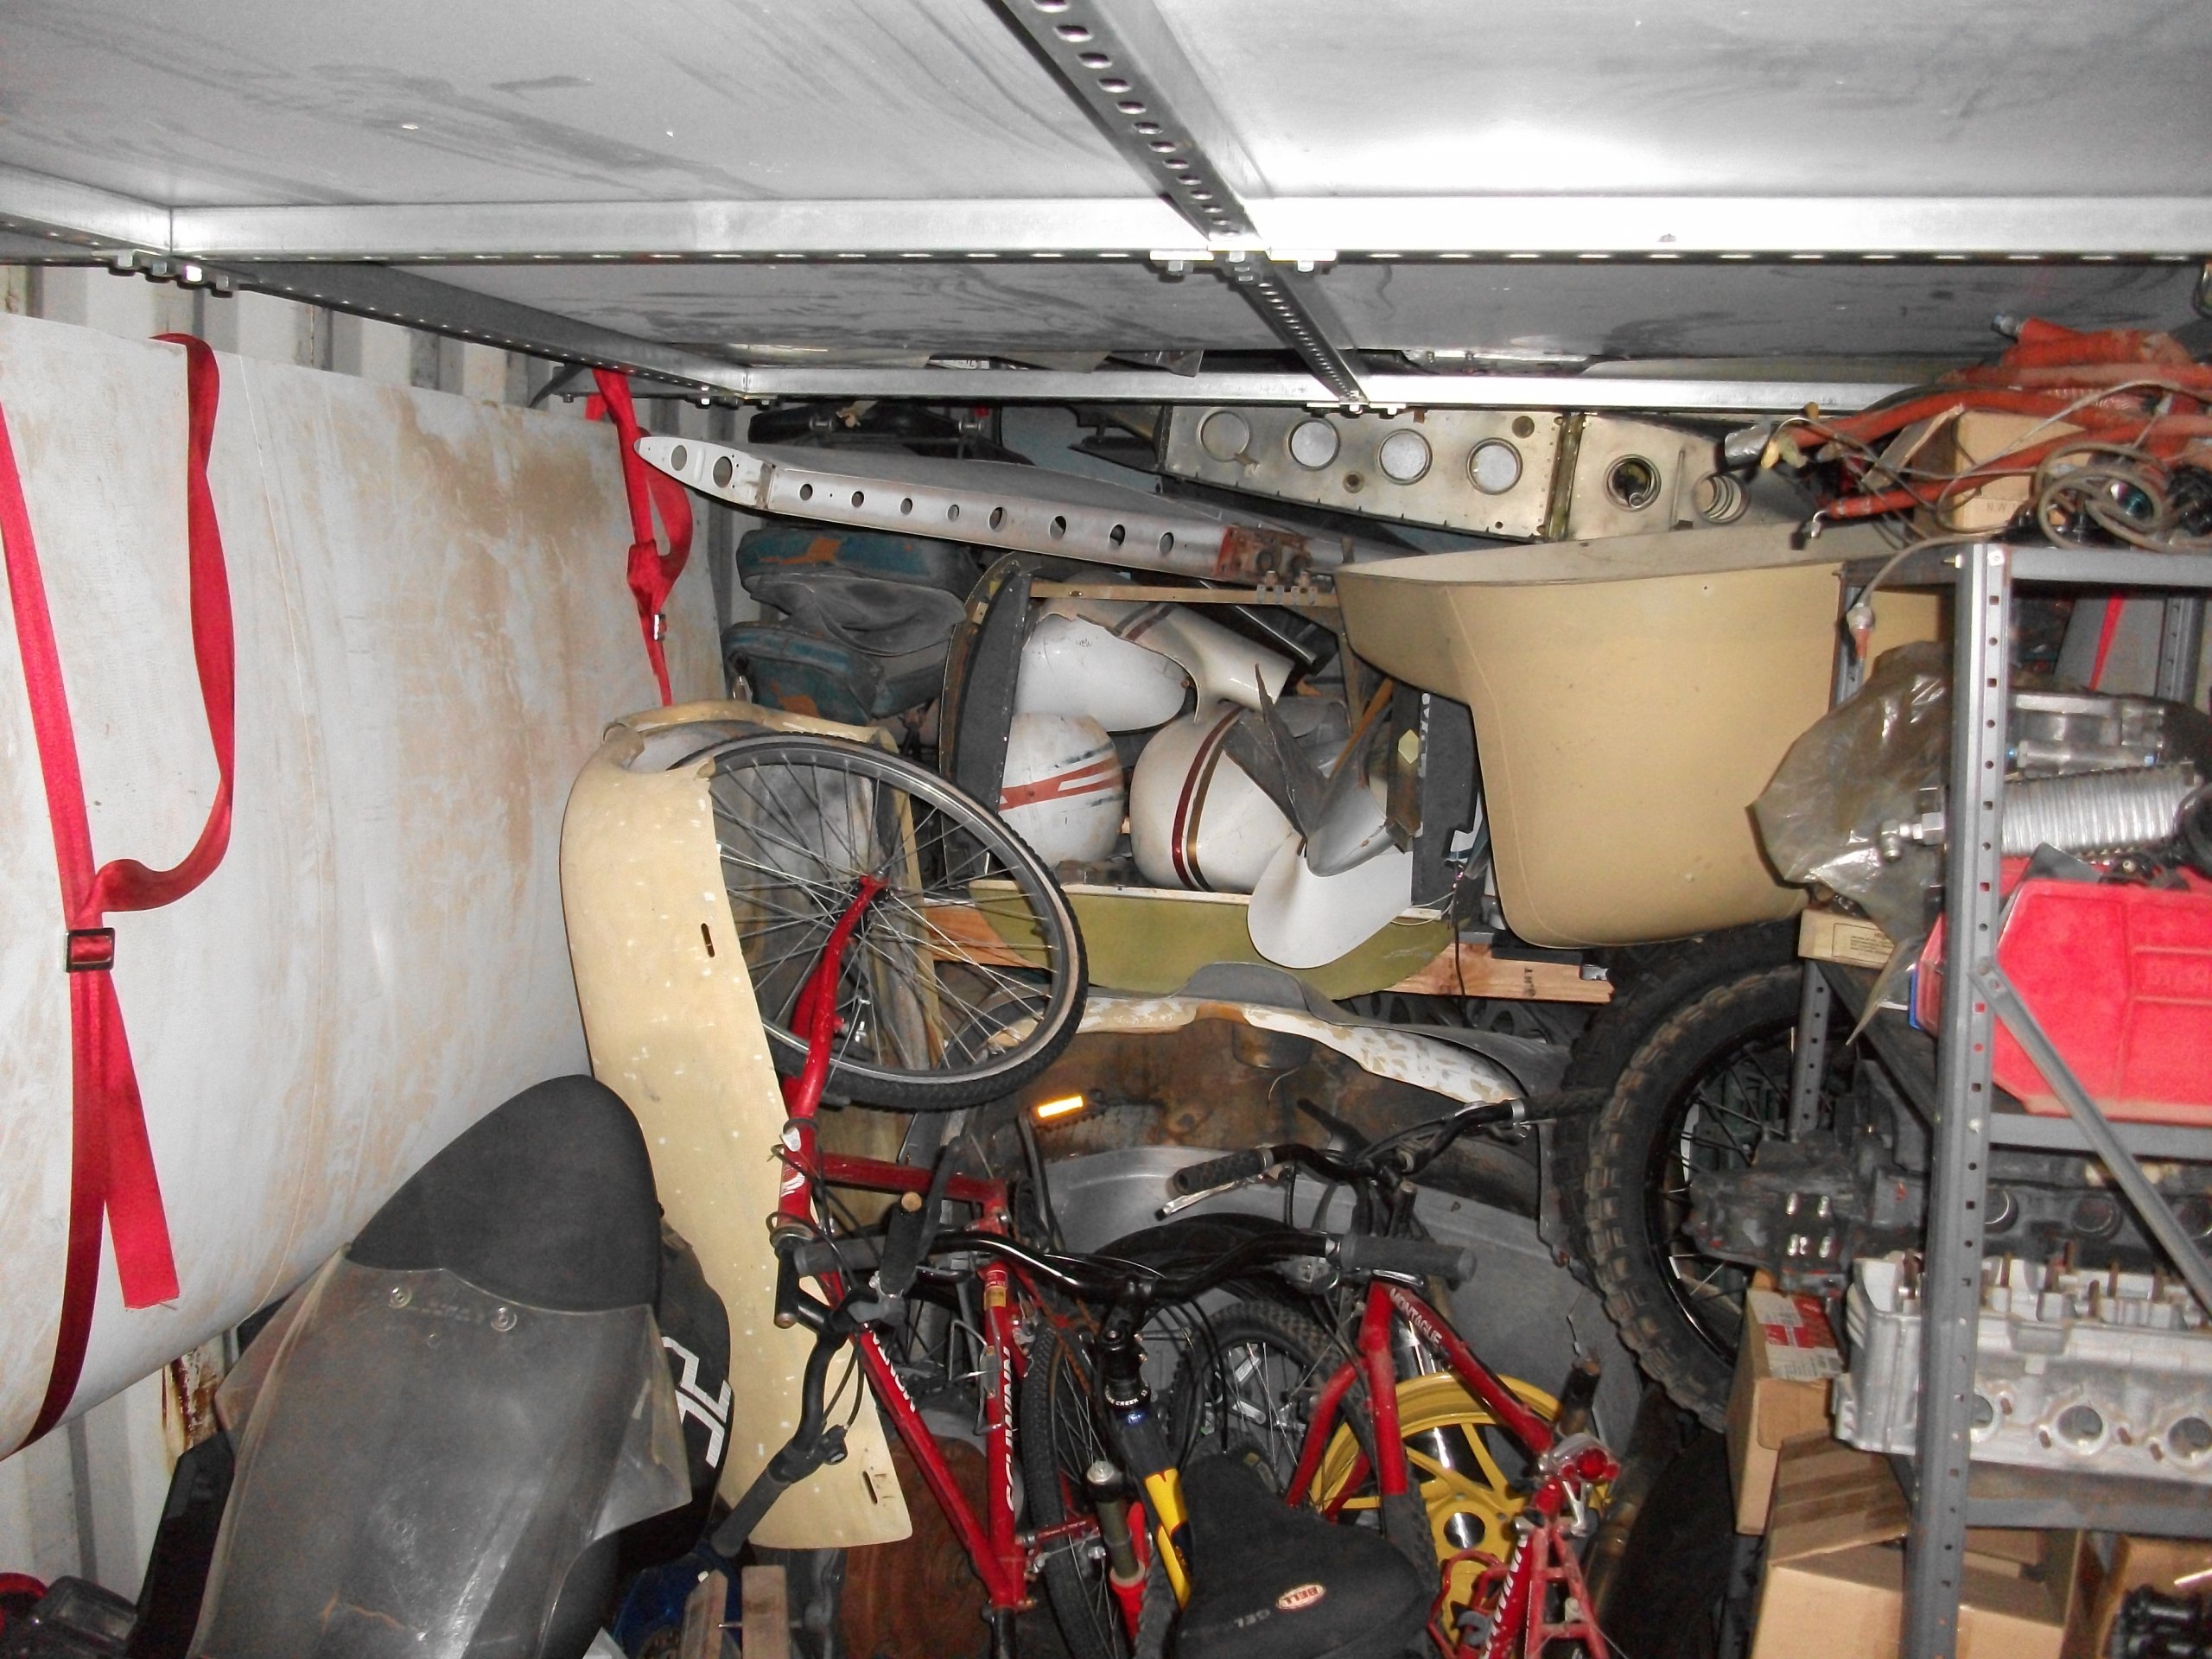
ParticipantFound this in a garage here in Phoenix. Been stored for the last twenty years! Needs a complete teardown, all ADs checked for compliance. Wings and tail feathers were stored in a shipping container. Will need new class, interior plastic & upholstery. Should keep me busy this winter!
Attachments:
You must be logged in to view attached files. -
February 16, 2021 at 13:19 #15341
 Richard HarrisonParticipant
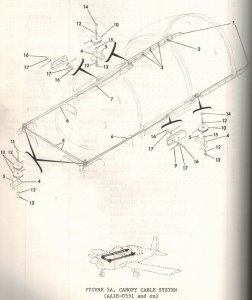 Paint looks good from the picture. That should be a ’76 year model like my -1B. The way to tell is if it has the square inlet nose bowl.
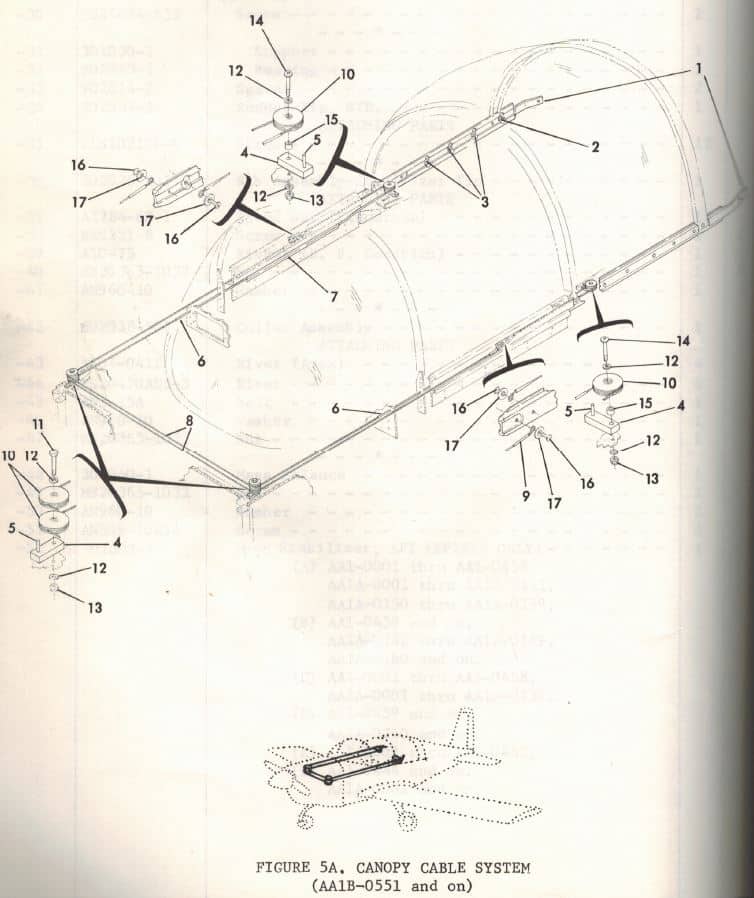
Consider putting back in the canopy tracking cables. You have the short canopy rails and should have the pullies up at the firewall and behind the canopy. This keeps the canopy straight and prevents it from binding when opening and closing, thus reducing stress on the canopy. They were removed due to a Factory Service Bulletin resulting from issues at flight schools with the cables coming loose and binding the canopy. It was never an AD. Just check the tension on the cables periodically. It has been about 20 years since I reinstalled them on mine.
Good luck with your project. I am still working on my AA-1 Yankee restoration.Attachments:
You must be logged in to view attached files.-
February 19, 2021 at 11:55 #15355Participant
It’s serial #0587 and has the square inlets. I have new cables for the canopy, I have to remove the pulleys and clean them up (they are stuck).
I just found out the windshield bow is bent slightly, as it does not match the canopy frame where they meet. Most likely damaged in storage. The canopy was never removed from the airplane but the windshield was removed (and lost) so it seems the canopy frame is ok. I need to check with Roscoe if I am unable to straighten mine to see if he sold all of his. At one time he had a barrel full of windshield bows but I don’t know if he still has them.
Attachments:
You must be logged in to view attached files.
-
-
February 19, 2021 at 13:24 #15357Richard HarrisonParticipant
Looks like you are going to town with your restoration. Keep posting pictures!
-
February 19, 2021 at 21:04 #15362Participant
Getting ready to install the trailing edge mod per SK125A
Attachments:
You must be logged in to view attached files.
-
-
February 20, 2021 at 15:02 #15365Richard HarrisonParticipant
Did you have debonding issues with your control surfaces? My AA-1B SN 0632 has never had any, but it is post Purple Glue. Yours might be at the tail end of the Purple Glue use.
-
February 20, 2021 at 20:45 #15366Participant
No debonding issues found, just thought it might be a good preventative measure.
-
February 20, 2021 at 22:39 #15369Participant
Also protects against bird strikes….. 🙂
-
-
February 20, 2021 at 20:47 #15367Participant
Panel work is about done.
Attachments:
You must be logged in to view attached files. -
February 22, 2021 at 21:04 #15375Participant
Got the windshield frame straightened out today, now to finish the repair to the upper cowling.
-
February 22, 2021 at 22:05 #15377Richard HarrisonParticipant
When we were cleaning out Ken Blackman’s shop I found a brand new never installed top AA-1 cowl. I was not willing to let that go to Roscoe on the container we were loading everything else into wanting to make sure it stayed pristine. Reluctantly few months later I drove it back to Roscoe, well rapped. Roscoe sold it last year, hope it went to a good home.
Attachments:
You must be logged in to view attached files.-
February 24, 2021 at 11:53 #15383Participant
I would have loved to have bought that, I have to replace the aft 1 1/2″ of my upper cowling (and all of the underside parts) as the cowl skin was chewed completely through id a few places. Also the forward side had to be replaced as the doubler had been chafed through by the fiberglass nose bowl (glass is harder than aluminum). Also, the side capture features were damaged and had to be replaced. The tabs sticking up from the lower cowl also had to be replaced as they were both damaged. Getting all the sheet metal parts to fit properly was a major challenge, I had to use multiple parts for the doublers and flanges.
Attachments:
You must be logged in to view attached files.
-
-
February 24, 2021 at 16:49 #15390Richard HarrisonParticipant
I just made a score on some parts from an AA-1A being parted out in Arizona. The airplane went on it’s nose, the nose gear collapsed. I don’t know the entire story but the lower cowl is crunched. They said the top cowl is OK, but I would want to see detailed pictures.
You can contact them at:Arizona Air Salvage
3233 W. Yuma St.
Phoenix, AZ. 85009Office Land Line: 602-354-7405
-
February 26, 2021 at 14:10 #15393Participant
Thanks, I’ll give them a call
-
-
February 25, 2021 at 17:18 #15391
 John C FordParticipant
Looks like fun. can’t wait to actually start working on mine. AA1-A #0289. Waiting on a FAA 12 week backlog on paperwork…
~J~
-
February 26, 2021 at 14:11 #15394Participant
The FAA has been even slower that normal, what is it that is holding things up?
-
March 12, 2021 at 13:22 #15447John C FordParticipant
The previous owner let the registration laps last year. Also, we found a lean on the title that goes back to 1984. Got it all cleared up. It should be in my name this month.
-
-
February 26, 2021 at 22:14 #15395Richard HarrisonParticipant
I am headed down to Arizona next week to pick up what I bought. If you want eyes on items you are interested in, let me know.
-
February 27, 2021 at 11:55 #15397Participant
Let me know when you will be here, I am in north Phoenix, we can meet somewhere and go look at the stuff. Will you be driving?
-
-
February 27, 2021 at 15:58 #15398Richard HarrisonParticipant
Yes I am driving. We are targeting to be at the salvage yard on Wednesday. I will send you a private message with my contact info. Send me an email with yours.
-
March 6, 2021 at 19:36 #15413Participant
Upper cowling is FINALLY complete. Took about two months!
Attachments:
You must be logged in to view attached files.
-
-
April 26, 2021 at 23:03 #15746Participant
Fuselage clean-up nearly complete. 220 wet sanding (gentle, like petting a baby duck) and soda blast.
Attachments:
You must be logged in to view attached files. -
April 27, 2021 at 13:39 #15749Richard HarrisonParticipant
Your making great progress!
-
May 1, 2021 at 17:10 #15757
Corl Leach
ParticipantWatching your restoration with interest as I have N1479R, s/n AA1B-0579. I’d be interested in knowing where you are acquiring the seat belts / harnesses ’cause I’m seeking new ones!
-
May 1, 2021 at 21:01 #15758Participant
I purchased some used ones a while back, however I found what looks like a better deal at Wag Aero. You could buy two sets of seatbelts and a single set of the shoulder harness kit, since the -1B only uses a single strap for each seat. That would give you a new approved set.
-
-
May 1, 2021 at 21:03 #15759Richard HarrisonParticipant
If you have your old ones your best bet is to send them in to one of several companies that will clean up all the hardware and put new webbing on them. They still must have the FAA certification tags on them. I think they run around $150 – 200 per seat for the lap and shoulder belt.
If you are missing belts or are missing the tags, then you might contact Fletchair. They use to have new old stock belts (that due to age would need to be rewebbed) and I know they have boxes of used belts that could be “cores” for rewebbing.I own AA1B-0632 (N1632R). At my old airport there was also AA1B-0633 (N1633R). We use to go flying together and when we were both in the pattern at the same time the tower controller had a hard time keeping us straight.
-
May 1, 2021 at 21:18 #15761Participant
You will want to check the prices at Wag Aero for new belts and shoulder harness before re-webbing an old set, it might be cheaper to just purchase new.
I did just receive the new firewall blanket material from them, looks just like the original..
-
This reply was modified 2 years, 11 months ago by
-
This reply was modified 2 years, 11 months ago by
-
-
May 9, 2021 at 09:03 #15782
Glenn Mori
ParticipantHi y’all,
Just trailered home our new Father/Son project. N9901L serial #0201. Hasn’t flown since 2006 ish. Last annualed in 2010. I’ll try to attach a picture or two. Taking it to my mechanic tomorrow to help me get organized.
I know the center spar is no good. Have deposit on one in Ohio. Need to start a parts list. I have so many questions to get answered. Like how to strip paint and mot effect the bonding? Who has the tailwheel conversion STC, the aux fuel STC and the larger engine STC?
I need to really make sure my wings are good to go. I’m worried about the wing Spare since the center was corroded. Tanks were completely empty and the one tank (right) that I put fuel in to start it leaked. My stepson is 16 and soled our Cessna 140 last month. I would love to have this completed by the time he graduates high school and the plane will be celebrating its 50th birthday.Glenn, Donah and Dawson
Attachments:
You must be logged in to view attached files.-
May 9, 2021 at 10:43 #15786Participant
Wow! You now have a project for sure. There are plenty of folks on here with experience with these aircraft and are able to help with advice and links to suppliers of parts. I removed the paint from my project by using a 5″ DA sander (air) with 220 WET disc. GENTLY (like petting a baby duck) taking off most paint. The areas the sander doesn’t reach were soda blasted. Harbor Freight sells a small soda blaster and the medium grit soda (you will use several bags of the stuff). I also purchased a portable garage from them to contain the blast media. I set up the portable garage in my hangar where I have a large compressor, you will need a lot of air at around 90psi. Do you have the maintenance manual and parts book, there are very handy.
-
-
May 9, 2021 at 09:09 #15784Participant
I guess I can only send one pic at a time depending on the file size. Jere is one from yesterday
-
May 9, 2021 at 09:11 #15785Participant
Maybe this one will work.
Glenn
-
June 6, 2021 at 17:29 #15916Participant
Wings finally cleaned up and primed. Zinc chromate first, followed by sandable epoxy primer. Polyurethane top coat to follow.
Attachments:
You must be logged in to view attached files. -
June 6, 2021 at 17:29 #15918Participant
Epoxy primer
Attachments:
You must be logged in to view attached files. -
June 22, 2021 at 10:16 #15967
eric macke
ParticipantAnother father/son project located out of West Michigan. Thanks for all the info posted here. Learning from you guys as we work on putting this aa1a back in the air.
Attachments:
You must be logged in to view attached files.-
July 12, 2021 at 11:59 #16027Participant
Same paint scheme as mine, they must have painted a bunch of them like that. I’ll probably paint mine in the original scheme as well.
-
-
July 12, 2021 at 11:54 #16023Participant
Finally shot the inside with Stitts Epoxy primer and installed provisions for the remote boxes. Built new wire harnesses, new instrument panel deck in progress
Attachments:
You must be logged in to view attached files.-
August 6, 2021 at 11:19 #16156
Eric macke
ParticipantVery nice work. What in the world are all those boxes you have there behind the seats? Will it effect the weight and balance? Looks to me like I need to step up my game.
-
August 6, 2021 at 12:23 #16157Participant
A Collins GLS350 glideslope receiver, Collins TCR451 DME RT, Narco AR850 encoder, King KG102A DG. Still need to add the ADS-B. Initial W&B calculations indicate ok. Baggage limit was 100lb, this stuff is about 10 lb. Needed it to drive the excessively equipped panel.
Attachments:
You must be logged in to view attached files.
-
-
July 12, 2021 at 11:55 #16025Participant
New instrument panel deck in progress
Attachments:
You must be logged in to view attached files. -
August 2, 2021 at 20:41 #16127Participant
New windshield fitment….Canopy is next.
Attachments:
You must be logged in to view attached files. -
August 2, 2021 at 21:44 #16129Richard HarrisonParticipant
Looking good. What did you use to bond the windshield to the bow?
Interesting fixture attached to the engine mount extrusions, I assume this allows the fuselage to be rotated upside down?-
August 3, 2021 at 17:32 #16145Participant
Using LP Areoplastics windshield. so will be using per the instructions. PR142 adhesion promoter (Primer) and the 2 part polysulfide B-2 bonding adhesive. Either 890 b2 or the one sold by Flamemasters. I believe either will work. Finished the final trimming and fitting today, have not drilled any holes yet. Roscoe has a good video out there showing some helpful hints. The spacer blocks are absolutely required for proper alignment, using a unibit for the holes also works well. I will position an engine hoist near the rear window (I can’t reach the top of the hangar to tie a rope) to assist in egress. It’s either that or sit inside the airplane for the three days it takes to cure the adhesive. As soon as the windshield is complete, the canopy is next up. Both are 3/16 thick, the windshield is clear, the canopy is gray tint.
-
-
August 4, 2021 at 22:33 #16153Richard HarrisonParticipant
The last time I changed the canopy on my AA-1B (some 20 years ago) they were at that time recommending to use a product similar to Proseal to bond to the bow, as the original Dow Corning primers (1200 & 1205) became very hard to obtain.
I did the install with that material and after about 5 hours the canopy started debonding from the bow. I removed the canopy and cleaned up everything. I was living in the SF Bay Area and there was a Dow Corning distributor that could get me the primers, but only in pint size containers. It only takes a couple of ounces of each to do a windshield. I went ahead on purchased the primers and using the Dow 732 RTV I rebonded the windshield. It was not cheap to do that, but 20 years later the canopy has never debonded. My windshield was last done some 25 years ago, using the same Dow Corning process.
If I can still get those primers, I am inclined to go that route when I install the canopy and windshield on the Yankee project.-
August 6, 2021 at 12:25 #16159Participant
Yikes! The LP instructions list the Proseal type sealant with the PR142 primer. I guess I’ll try it and hope they are correct.
-
-
August 6, 2021 at 14:53 #16160Richard HarrisonParticipant
I don’t recall that I used a primer with the Proseal, nor was any mentioned in the instructions in those days. Hopefully that will make the difference.
-
March 23, 2022 at 22:17 #16870Participant
Making a little progress on the project. Fabricated new panels out of sheet metal for the bag compartment, covered with hyde of the nauga. Glareshield done with black fabric, matte black.
Attachments:
You must be logged in to view attached files. -
March 23, 2022 at 22:24 #16873Participant
Does anyone have a close up picture of the canopy bow attaching hardware? I am looking for items #11 and #12. They look to be some little brackets or retainers. Whoever took this thing apart lost them.
Attachments:
You must be logged in to view attached files.
-
-
AuthorPosts

- You must be logged in to reply to this topic.